Moving your Google Analytics tracking (whether it's through Google Analytics 4 or standard universal analytics properties) server-side is crucial if you want to ensure that you don't miss out on any details or data pertaining to the customer journey on your website.
As you surely know, client-side tracking is susceptible to being blocked by 3rd-party cookie restrictions, Ad-Block extensions, settings that exclude Javascript from being run in the user's browser, or various other privacy controls that may prevent client-side tracking (such as basic GA4 or Universal Analytics and Google Ads) functionality from working correctly on the client device, thus keeping certain user data from making it into your Google Analytics account, which can obviously be very detrimental to your business.
This means that, when run client-side, tracking is not 100% accurate, so the solution to this is to move everything server-side, which is quite simple to do with Google Tag Manager and Google Analytics 4. Server-side refers to bypassing 3rd-party cookies and sending the analytics data directly to your own Analytics server, therefore transforming 3rd-party cookies into 1st-party cookies!
Does this mean client-side tracking is obsolete?
Definitely not! Client-side tracking is still very much relevant, and implementing a server-side solution simply alongside that simply ensures you gain access to more accurate data.
If you're running an eCommerce store on Magento 2, make sure you check out the How To Add Google Analytics 4 (GA4) To Magento 2? article, which goes over a step-by-step process of adding Google Analytics 4 tracking to your store! The process can be simplified even further with our powerful Google Analytics 4 (GA4) With GTM Support for Magento 2 extension!
Creating The Server-Side GTM Container
If you already have a Google Tag Manager setup through which you handle client-side Google Analytics tracking, be it Google Analytics 4 or standard universal analytics properties, you'll be familiar with this process as it's not much different.
-
Head over to Google Tag Manager and login to your Google account.
-
If you don't already have an Account (which houses each Google Tag Manager Container), create one now. For the purpose of this guide, we'll assume you already have an Account created.
-
Find your Account in the list, click the 3 dots next to the Settings Cog, and click Create Container.
-
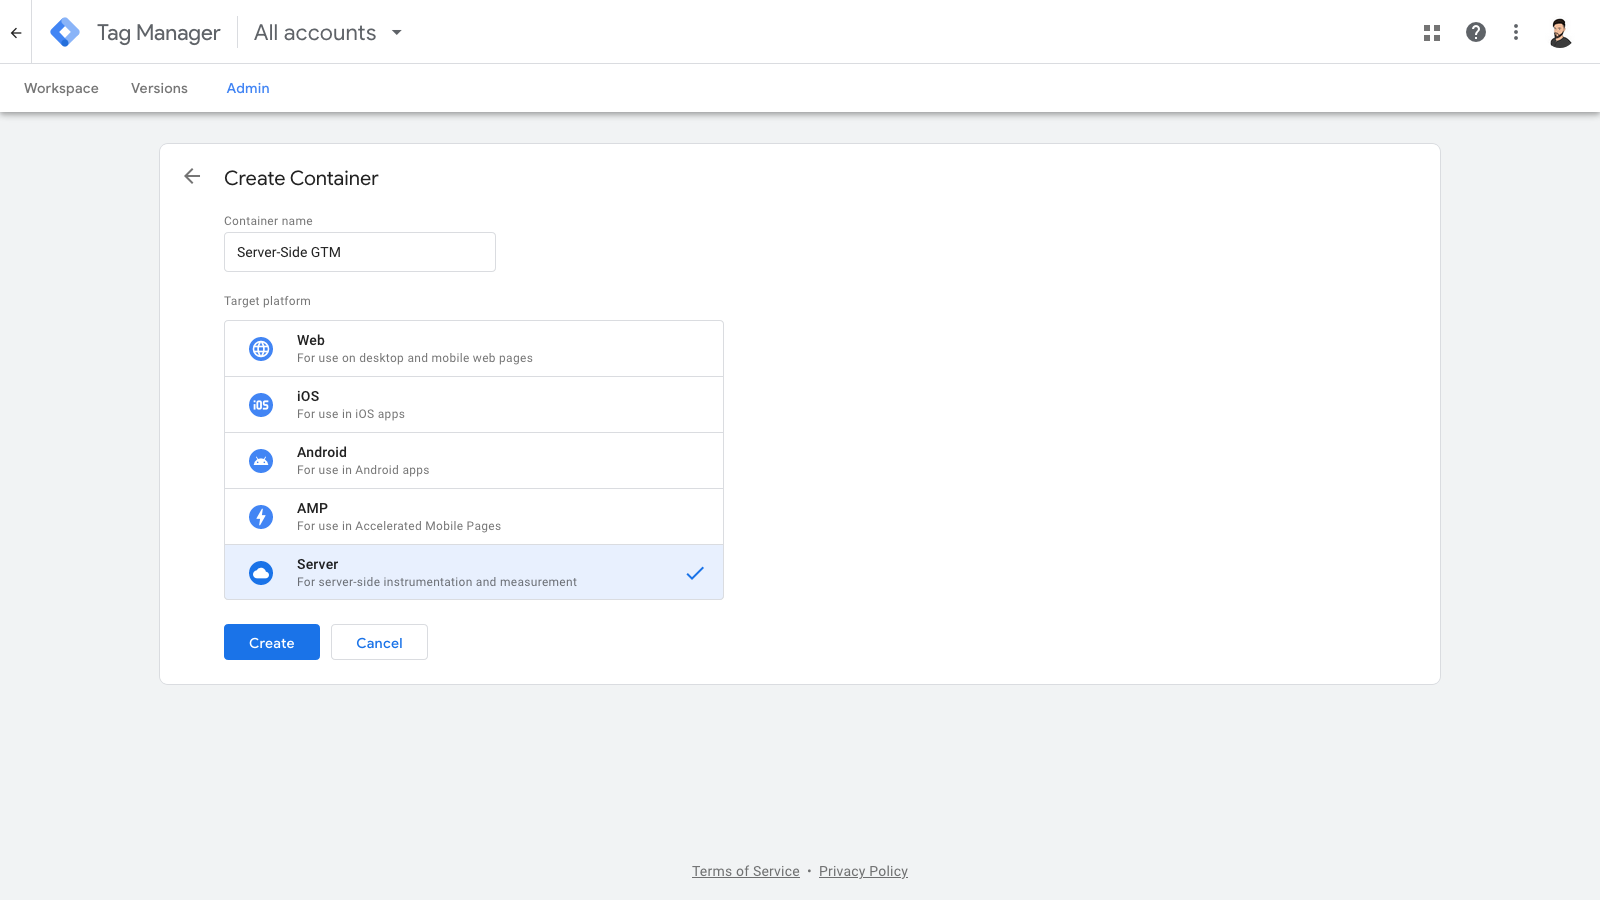
On the Create Container step, you'll be able to select which type of container you want to set up. To set up server-side tracking, you'll need to select Server under Target Platform.

-
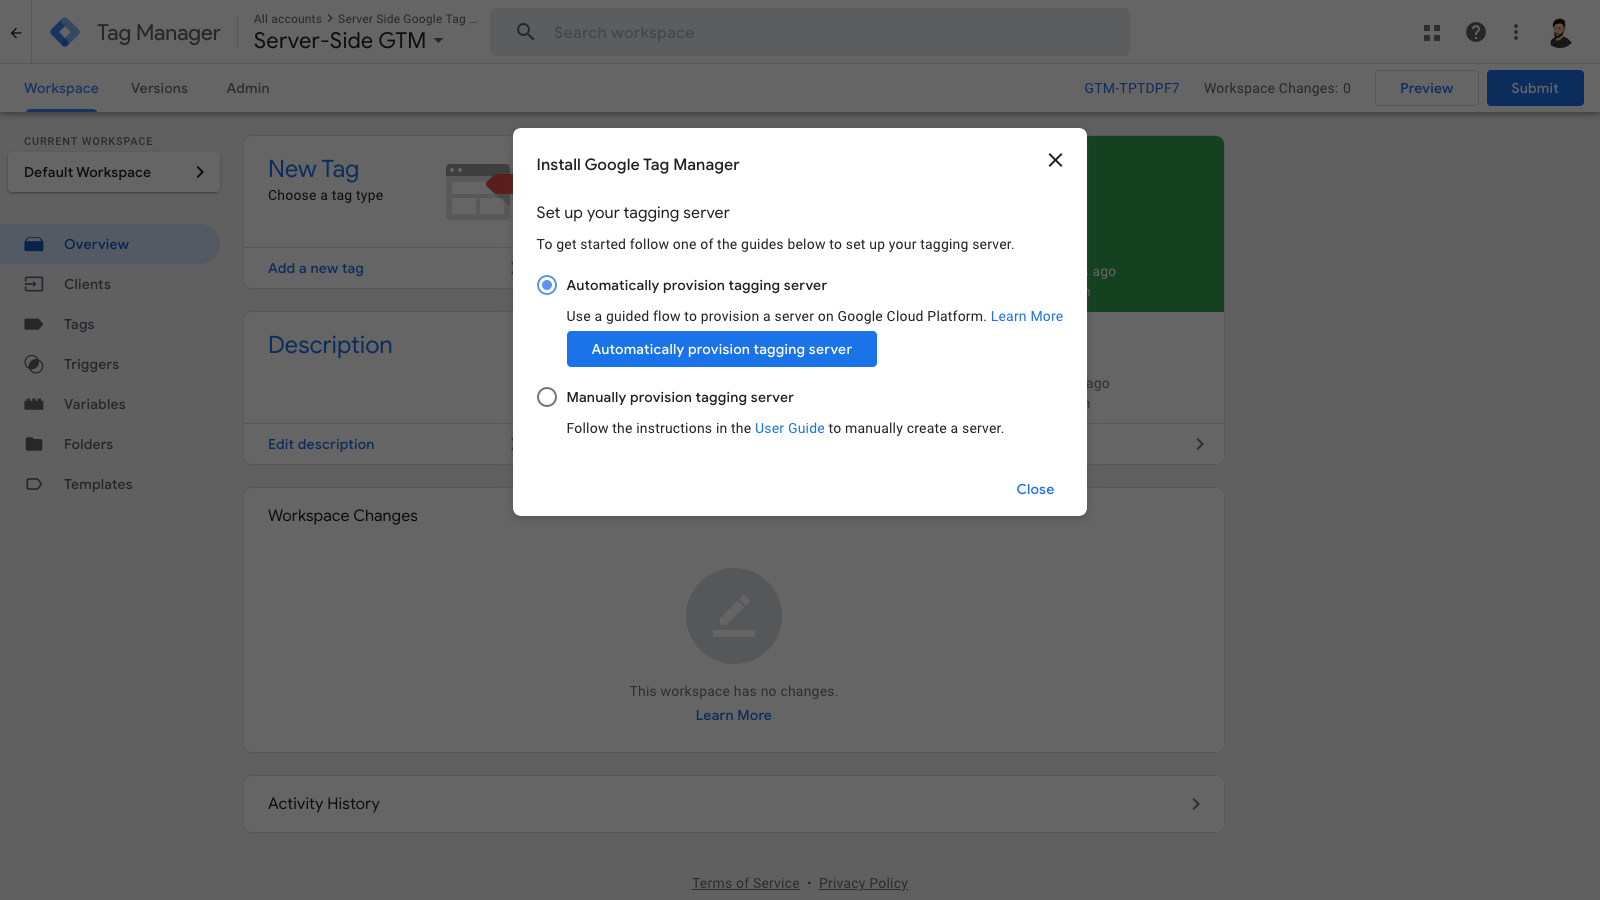
Click on the Create button. Once the Container has been created, you'll see a prompt on the page that allows you to choose how you'd like to install Google Tag Manager by setting up your tagging server. For the purpose of this guide, we'll be moving forward with the Automatic Provision method, which will set up a server in the Google Cloud Platform.

-
After selecting your billing account, Click Select billing account and create server. This process will take a few minutes to complete, however, once it's done, you'll have a brand new server set up on the Google Cloud Platform which will allow us to continue the setup for server-side Google Analytics tracking.
Automatically Provision Tagging Web Server Vs Manually Provision Tagging Web Server
There are two methods of setting up your tagging server in order to be able to implement server-side Google Analytics tracking.
Automatic Provision
This method involves Google automatically setting up a new web server for you on the Google Cloud Platform. It's a very simple method as all you need to do is follow the on-screen prompts and you'll be good to go in no time! You will, however, require a billing account connected to the Google Cloud Platform, so if you don't have one, make sure you create one.
Manual Provision
This method is intended for websites or users that want to use their own servers and do not necessarily want to have the tagging server set up using Google Cloud Platform, so, for instance, your own AWS Servers or a managed hosting solution. The setup for this method is a bit more complex so you may need to consult the Server-Side App Engine Setup Guide for more precise.
My Server Is Ready. What's Next?
Now that you have your server provisioned, it's time to move on to the next step, which involves setting up a custom domain for your Google Tag Manager Server-Side Container. This process is very simple and can be started via the Google Cloud Platform, however, you'll also need access to your DNS settings as you'll need to set up some DNS records.
Check out all the steps in the guide here:
- Step 1: How to create a server-side GTM container
- Step 2: How to set up a custom domain for your GTM server-side container
- Step 3: How to send data to your GTM Server-Side Container
- Step 4: How to preview and debug the server-side container
- Step 5: How to monitor realtime server-side data in Google Analytics 4
- Step 6: How to move the Google Analytics 4 tagging server from testing mode into production mode